Friday 24 May 2013

New Bag style


 I have been playing about with new bag designs this last couple of weeks, so I thought I would share the process and see what you think of the new style. I wanted to make a smaller cross-body handbag size bag.


I always start first with a piece of paper, it means I can fold it and get and idea of the bag shape and most importantly I can make another one the same size if I need to ! 


I then make the design up in rough with some scrap fabric to get a better idea of the size - In this case I decided the scrap one was a bit tall, so I reduced the height of it.


Finished version - first attempt. I love the fabric/strap combination on this - I also did my first Zip on the oilcloth instead of the lining - it ended up being a little low on this version but I'll move it for next one.


Fastens with a mag snap


I also thought the internal oilcloth placket was a little too deep.


Version 2 ! 


This time I lined the external pocket with a bright contrasting fabric.


I made the internal placket smaller - but then decided I think I prefer the deeper one so will go back to that on the next on


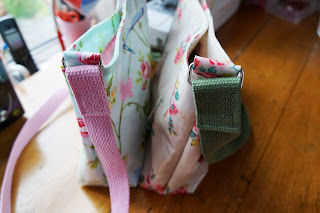
I also tried making this one with narrower straps - it still sits slightly open at the top, which I liked.


The 2 bags together for comparison


In these 2 pictures you should be able to see the differance the 2 sizes of straps make.

Which straps do you prefer? What do you think of the new design ?
Posted by Picasa

Sunday 5 May 2013

Dressmaking


There is something about the weather getting a little warmer that makes me want to start dressmaking again - most of my hand-made clothes are summer ones.

While I was sorting through my patterns, I thought I would share with you how I organise and store my patterns.

First of all I have a record of my favourite patterns on springpad, I take a picture of the front of the pattern envelope, then I either write the fabric requirements underneath the picture, or if I can get one clear enough, I take another photo of the back of the envelope. This means that if I am in the fabric shop and see the perfect fabric for a project, I know exactly how much I need, no more trying to guess !


I don't know about anyone else but I find that once I have cut out a dressmaking pattern, I can never fit it back in the paper envelope, so I have given up trying and now just store them in these plastic zip wallets, A5 seems to be about right. I did think about colour coding which patterns went in which wallet (Yellow for children's, green for dresses etc) but haven't got that far yet !


When I have finished making an item, I then staple a scrap of the fabric to a piece of card, on the card I will write if I made any fitting adjustments and any little things which I need to remember if I am making the same pattern again. If it is something for the children, I will also write down what size I made - makes it easier to remember when I go up a size.


I then pop the card in the back of the envelope where I can see it easily when I am flipping through the patterns, this means I can see at a glance which pattern I used for a particular item. All my patterns are then stored in a large box so I can easily find whatever I need.

How do you store patterns ? Do you have any other great tips ?

Posted by Picasa

Friday 26 April 2013

Make do and mend


I tried something differant - my son managed to put a hole in the knees of his Jeans - as they still had plenty of life in them I decided to go for the patching option rather than recyling - I had some gorgeous fabric from Fabric Rehab which made the perfect patch - in fact he loved it so much I may have to patch some of his un-holed jeans !


Posted by Picasa

Friday 19 April 2013

Product Photos

I have been looking at the photos on my website, and I'm not altogether happy with them at the moment. I think partly because The light hasn't been great all winter and I have to rely on natural light as I don't have studio lights. I have recently got a new camera so thought I would have a play with some different styles of picture. At the moment I take my product photos in a pop-up photo tent sat on the spare bed, however this may not be the best option. I would love your feedback on the different styles, all the pictures were taken this afternoon in the same light, and apart form the first one have had no editing.
Our spare room is due to get new windows next week and then a redecoration, so excuse the walls in the background  (spot the paint samples !) Obviously for doing proper website photos I will only do them once the walls have been painted.


This is how my product photos would normally look (although I would iron the backdrop first !) - it has been taken in my pop-up tent, cropped and lightened a little.

This is a photo from the pop-up tent, but without the editing.

Taken on the set of drawers with a vase of flowers as a prop

Same set-up but using flash, oilcloth is really hard to photograph using a flash as it tends to reflect back.


Sat on a chair


Hanging on the back of the chair


In the photo tent with a flower vase prop


Rocking chair (This would normally be against a blank wall but the furniture is all moved at the moment pending the decoration)


On the fireplace with flash


Fireplace with the same flower vase.

What style do you prefer ? The plain white background or the 'lifestyle' ones. I also wondered about using a prop to show the relative size - I quite like my vase of flowers, but I also have a vintage sewing machine I could use. I wondered about using a 'lifestyle' photo with a prop as the main product image with a selection of ones taken in the tent to shop details (lining, pockets etc) This then gives me lighting problems particularly during the winter months. How do you do your product photos ?
Posted by Picasa

Saturday 16 March 2013

Spam

I've been getting increasing amounts of spam in the comments on the Blog - Blogger does seem to be catching some of it but some is creeping through. It is usually just very bland "your site is great etc - please click on my (dodgy) Link" but I got some pornograpic spam yesterday, which was published on the site - don't worry all been deleted now.

Because of this I have now changed the comments settings, so that all comments have to be moderated, its a bit of a pain, but the alternative is to put a captcha on, and I like most people hate them with avengence !

What do you do about spam on your Blog ? What works well for other people ? (Moderated !) comments below !


Thursday 14 March 2013

Crochet


I have always wanted to learn how to crochet - I have my Grandma's old crochet hooks, I have even made a lovely roll to hold them, even though I couldn't use them !


I have always looked at the classes at French Knots Studio and wanted to do a few of them, but they have never seemed to fit with a date I could do, however I meet up regularly with a group of mums from school, and there seemed to be few of us wanting to learn crochet. I spoke to Jo and she was happy to come to the house and do a Crochet evening for us. We all started slowly learning how to do a granny square, but we soon got going and even opened the wine while we crocheted ! We all got on really well with the Crochet and Jo was a very patient teacher.


I have now got the hang of doing granny squares, and Baby Annabel has a new pram blanket !


Of Course I had to make a small case to keep my scissors and a couple of hooks in - I have found that I get cramp in my hand with a normal hook, so have been trying a few different ones, so far I think the knit-pro comfort ones are my favourite.

I bought the Nicki Trench Cute and Easy Crochet book from Amazon, and decided to tackle the Springtime throw.


The one in the book uses over 400 squares, so I think I may make mine a little smaller, as I have only made a few so far !


I am still trying to Crochet flowers, as I would to attach them to some bags. I have done a couple but none good enough to share ! - I may have to go back to see Jo at French Knots and join in one of her flower crochet classes !
I am defiantly hooked on Crochet, and it is great to have a craft which is a little more portable than a sewing machine.
Posted by Picasa

Monday 11 March 2013

Stall display

Most people who have ever had a stall at crafts fairs will tell you that it is always changing in terms of designs, every time you go to a fair you compare notes with other stall holders about how to improve the look of the stall - I have a whole Pinterest board about stall ideas.

I thought I would share how my display has developed over the last year.


My first stalls - I used a tablecloth which we already had, along with baskets we already had, the stall looked quite cluttered and nothing matched !


I then managed to pick up a bag holder  second hand on ebay


This meant the stall looked less cluttered, I was still trying different holders for cases etc but there was still a bit of a mixture.


I then got a proper table cloth and matching runner, I also made an applique sign to look like my logo (think I need to make a bigger one)


I also managed to a couple of vintage suitcases, which I lined in coordinating fabric, finished with ribbon and vintage style cotton lace, along with signs using the logo. I also added a jug of silk flowers.


I decided to make everything a bit Christmassy, for November and December - I added an Ivy garland, red fairy lights and bows to the top of the hanging rail.


I also added some lanterns, with battery operated tea lights, and wooden reindeer - the reindeer were very popular and lots of people tried to buy them ! (They were bought from Sainsbury's !)
 
 
This was my stall at the latest fair - I have added a wooden shelf, covered in matching fabric which gives the stall some height and is also useful to keep paper bags etc in while the fair is in progress.

I would love to hear your thoughts on the stall now, maybe you could share pictures of how your stall looks. Posted by Picasa